安裝Nvidia CUDA
- Install Nvidia Driver Using GUI
- Step 1: Open Software and Updates From the App Menu
- Step 2: Click the Additional Drivers Tab
- Step 3: Choose a Driver
- Step 4: Restart
- Step 5: Check nvidia info
- Step 6: install cuda tookit
- Step 7: Update kernel headers
- Step 8: Installing the Latest Version of CUDA from the Official NVIDIA Package Repository
- Step 9: install CUDA
- using nvcc to compile
- Install Nvidia Driver via Command Line
- Install Nvidia Beta Drivers via PPA Repository
- How to Uninstall Nvidia Driver
- 在使用安全启动的虚拟机上安装 GPU 驱动程序
- 验证 GPU 驱动程序的安装
Install Nvidia Driver Using GUI
Ubuntu comes with open-source Nouveau drivers for Nvidia GPUs out of the box. The Nouveau driver does not harness the GPU’s full power and sometimes performs worse or even causes system instability. Nvidia proprietary drivers are much more reliable and stable.
The first way to install Nvidia drivers is by using the GUI Software & Updates app.
Step 1: Open Software and Updates From the App Menu
\1. Open the Applications menu and type “software and updates.”
\2. Select the Software and Updates app.
Step 2: Click the Additional Drivers Tab
Wait for the app to download a list of additional drivers available for your GPU.
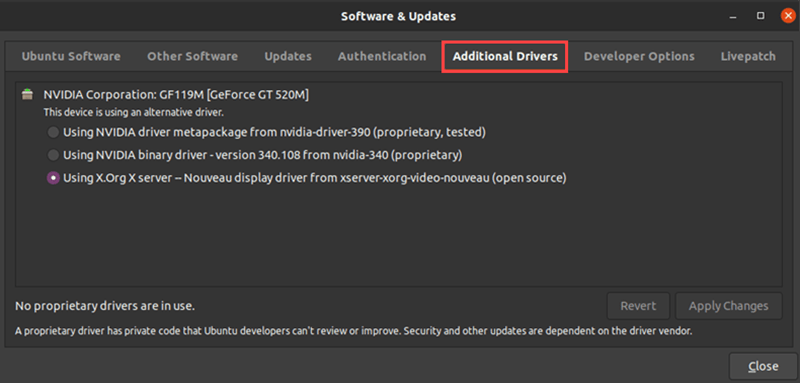
The driver installed on your machine is selected by default. It is usually an open-source Nouveau display driver.
Step 3: Choose a Driver
\1. From the list, select the latest Nvidia driver labeled proprietary**, **tested. This is the latest stable driver published by Nvidia for your GPU.
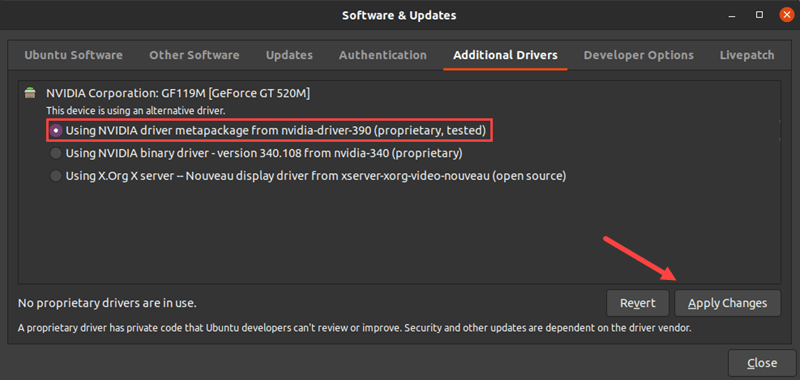
\2. Click Apply Changes.
\3. Enter your password and wait for the installation to finish.
Step 4: Restart
Restart the machine for the changes to take effect.
Step 5: Check nvidia info
$ nvidia-smi
+-----------------------------------------------------------------------------+
| NVIDIA-SMI 515.76       Driver Version: 515.76       CUDA Version: 11.7     |
|-------------------------------+----------------------+----------------------+
| GPU  Name        Persistence-M| Bus-Id        Disp.A | Volatile Uncorr. ECC |
| Fan  Temp  Perf  Pwr:Usage/Cap|         Memory-Usage | GPU-Util  Compute M. |
|                               |                      |               MIG M. |
|===============================+======================+======================|
|   0  NVIDIA GeForce ...  Off  | 00000000:01:00.0  On |                  N/A |
| 33%   28C    P8     1W /  38W |    372MiB /  1024MiB |      0%      Default |
|                               |                      |                  N/A |
+-------------------------------+----------------------+----------------------+

+-----------------------------------------------------------------------------+
| Processes:                                                                  |
|  GPU   GI   CI        PID   Type   Process name                  GPU Memory |
|        ID   ID                                                   Usage      |
|=============================================================================|
|    0   N/A  N/A      1034      G   /usr/lib/xorg/Xorg                101MiB |
|    0   N/A  N/A      1297      G   /usr/bin/gnome-shell              101MiB |
|    0   N/A  N/A      2688      G   ...777036185490121345,131072      164MiB |
+-----------------------------------------------------------------------------+
| run “lsmod | grep -i nvidia” |
lsmod |grep -i nvidia
nvidia_uvm           1323008  0
nvidia_drm             73728  7
nvidia_modeset       1146880  8 nvidia_drm
nvidia              40841216  334 nvidia_uvm,nvidia_modeset
drm_kms_helper        311296  1 nvidia_drm
drm                   622592  11 drm_kms_helper,nvidia,nvidia_drm
Step 6: install cuda tookit
sudo apt install nvidia-cuda-toolkit
check if works
nvcc --version
Step 7: Update kernel headers
sudo apt install linux-headers-$(uname -r) -y
Step 8: Installing the Latest Version of CUDA from the Official NVIDIA Package Repository
sudo apt install linux-headers-$(uname -r) -y
Now, download the CUDA repository Pin file from the official website of NVIDIA with the following command:
sudo wget -O /etc/apt/preferences.d/cuda-repository-pin-600 https://developer.download.nvidia.cn/compute/cuda/repos/ubuntu2204/x86_64/cuda-ubuntu2204.pin
add gpg key
sudo apt-key adv --fetch-keys https://developer.download.nvidia.cn/compute/cuda/repos/ubuntu2204/x86_64/3bf863cc.pub
Step 9: install CUDA
sudo apt install cuda
A new initrd image has also been created. To revert, please regenerate your
initrd by running the following command after deleting the modprobe.d file:
`/usr/sbin/initramfs -u`

*****************************************************************************
*** Reboot your computer and verify that the NVIDIA graphics driver can   ***
*** be loaded.                                                            ***
*****************************************************************************

INFO:Enable nvidia
DEBUG:Parsing /usr/share/ubuntu-drivers-common/quirks/lenovo_thinkpad
DEBUG:Parsing /usr/share/ubuntu-drivers-common/quirks/put_your_quirks_here
DEBUG:Parsing /usr/share/ubuntu-drivers-common/quirks/dell_latitude
Loading new nvidia-520.61.05 DKMS files...
Building for 5.15.0-52-generic
Building for architecture x86_64
Building initial module for 5.15.0-52-generic
.....................
choose the right cuda-drivers
CUDA_VERSION=$(apt-cache showpkg cuda-drivers | grep -o 'cuda-runtime-[0-9][0-9]-[0-9],cuda-drivers [0-9\.]*' | while read line; do
   if dpkg --compare-versions ${CUDA_DRIVER_VERSION} ge $(echo $line | grep -Eo '[[:digit:]]+\.[[:digit:]]+') ; then
       echo $(echo $line | grep -Eo '[[:digit:]]+-[[:digit:]]')
       break
   fi
done)
sudo apt install cuda-${CUDA_VERSION}
using nvcc to compile
#include <stdio.h>
#include <unistd.h>

__global__ void say_hello() {
    printf("Hello world from the GPU!\n");
}

int main() {

    printf("Hello world from the CPU!\n");
    say_hello<<<1,1>>>();
    cudaDeviceSynchronize();
    sleep(2);
    printf("Bye!\n");

    fflush(stdout);
    return 0;
}
nvcc say_hello.cu -o hello
├── hello
└── say_hello.cu

0 directories, 2 files
runing hello
./hello
Hello world from the CPU!
Bye!
Install Nvidia Driver via Command Line
The second way to install Nvidia drivers is by using the terminal.
Step 1: Search for Nvidia Drivers
\1. Open the terminal by pressing Ctrl+Alt+T or search for “terminal” in the Applications menu.
\2. Run the following command:
apt search nvidia-driver
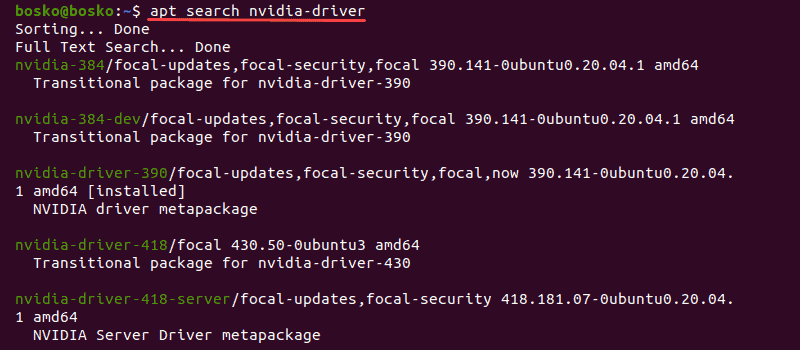
The output shows a list of available drivers for your GPU.
Step 2: Update the System Package Repository
Before installing the driver, make sure to update the package repository. Run the following commands:
sudo apt update``sudo apt upgrade
Step 3: Install the Right Driver for Your GPU
\1. Choose a driver to install from the list of available GPU drivers. The best fit is the latest tested proprietary version.
\2. The syntax for installing the driver is:
sudo apt install [driver_name]
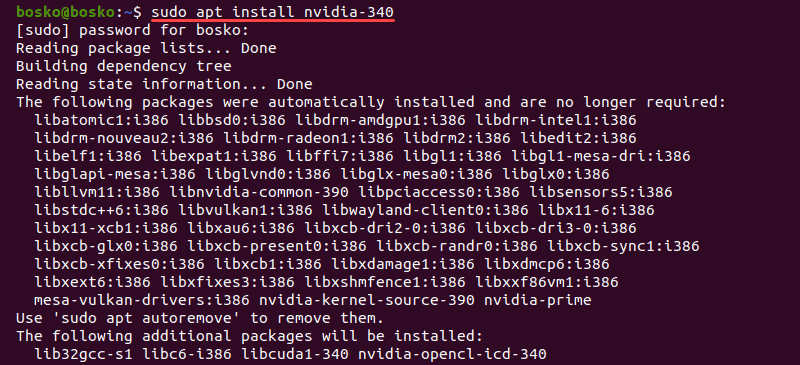
For this tutorial, we installed nvidia-driver-340, the latest tested proprietary driver for this GPU.
Step 4: Reboot
Reboot your machine with the following command:
sudo reboot
Install Nvidia Beta Drivers via PPA Repository
The PPA repository allows developers to distribute software that is not available in the official Ubuntu repositories. This means that you can install the latest beta drivers, however, at the risk of an unstable system.
To install the latest Nvidia drivers via the PPA repository, follow these steps:
Step 1: Add PPA GPU Drivers Repository to the System
\1. Add the graphics drivers repository to the system with the following command:
sudo add-apt-repository ppa:graphics-drivers/ppa
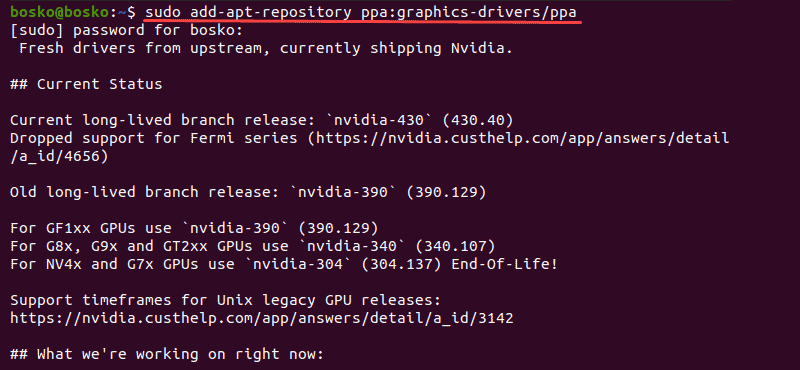
\2. Enter your password and hit Enter when asked if you want to add the repository.
Step 2: Identify GPU Model and Available Drivers
To verify which GPU model you are using and to see a list of available drivers, run the following command:
ubuntu-drivers devices
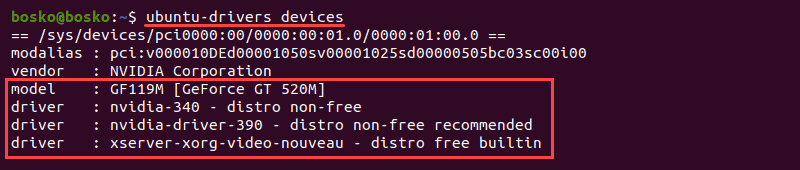
The output shows your GPU model as well as any available drivers for that specific GPU.
Step 3: Install Nvidia Driver
\1. To install a specific driver, use the following syntax:
sudo apt install [driver_name]
For example, we installed the nvidia-340 driver version.
\2. Alternatively, install the recommended driver automatically by running:
sudo ubuntu-drivers autoinstall
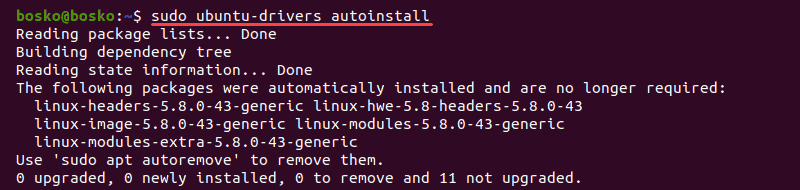
In this example, no changes were made as the recommended driver is already installed.
Step 4: Restart the System
Reboot the machine for the changes to take effect.
How to Uninstall Nvidia Driver
If you want to uninstall the proprietary Nvidia driver, the best option is to remove --purge the driver.
Step 1: See Installed Packages
To check which Nvidia packages are installed on the system, run the following command:
dpkg -l | grep -i nvidia
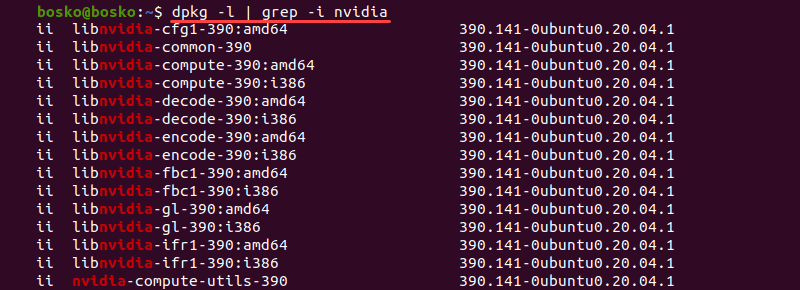
The output returns a list of all Nvidia packages on the system.
在使用安全启动的虚拟机上安装 GPU 驱动程序
启用了安全启动的虚拟机需要由系统信任的密钥签署所有内核模块。
操作系统支持
- 如需在使用安全启动的 Windows 操作系统上安装 NVIDIA 驱动程序,请参阅常规的在虚拟机上安装 GPU 驱动程序部分。
- 对于 Linux 操作系统,仅支持 Ubuntu 18.04 和 20.04 操作系统。我们正在设法支持更多操作系统。
更新代码库
sudo apt-get update搜索最新的 NVIDIA 内核模块软件包或您所需的版本。此软件包包含由 Ubuntu 密钥签名的 NVIDIA 内核模块。运行以下命令以查看最新的软件包:
NVIDIA_DRIVER_VERSION=$(sudo apt-cache search 'linux-modules-nvidia-[0-9]+-gcp$' | awk '{print $1}' | sort | tail -n 1 | head -n 1 | awk -F"-" '{print $4}')注意:如果您要查找早期版本,请更改 tail 命令中的数字以获取早期版本。
例如,将数字指定为
2可获取下一个早期版本:NVIDIA_DRIVER_VERSION=$(sudo apt-cache search 'linux-modules-nvidia-[0-9]+-gcp$' | awk '{print $1}' | sort | tail -n 2 | head -n 1 | awk -F"-" '{print $4}')您可以通过运行
echo $NVIDIA_DRIVER_VERSION来检查选定的驱动程序版本。输出是一个类似于455的版本字符串。安装内核模块软件包和相应的 NVIDIA 驱动程序:
sudo apt install linux-modules-nvidia-${NVIDIA_DRIVER_VERSION}-gcp nvidia-driver-${NVIDIA_DRIVER_VERSION}如果该命令失败,并且显示“找不到软件包”错误,则代码库可能缺少最新的 nvidia 驱动程序。返回到最后一步,以查找早期驱动程序版本。
注意:安装软件包时,系统可能会升级您的内核。
验证是否已安装 NVIDIA 驱动程序。您可能需要重新启动虚拟机。
配置 APT 以使用 NVIDIA 软件包代码库。
要帮助 APT 选择正确的依赖项,请按如下所示 Pin 代码库:
sudo tee /etc/apt/preferences.d/cuda-repository-pin-600 > /dev/null <<EOL
Package: nsight-compute
Pin: origin *ubuntu.com*
Pin-Priority: -1
Package: nsight-systems
Pin: origin *ubuntu.com*
Pin-Priority: -1
Package: nvidia-modprobe
Pin: release l=NVIDIA CUDA
Pin-Priority: 600
Package: nvidia-settings
Pin: release l=NVIDIA CUDA
Pin-Priority: 600
Package: *
Pin: release l=NVIDIA CUDA
Pin-Priority: 100
EOL
安装
software-properties-common。如果您使用的是 Ubuntu 最小映像,则必须执行此操作。sudo apt install software-properties-common添加 NVIDIA 代码库:
Ubuntu 18.04
sudo apt-key adv --fetch-keys https://developer.download.nvidia.com/compute/cuda/repos/ubuntu1804/x86_64/7fa2af80.pub
sudo add-apt-repository "deb https://developer.download.nvidia.com/compute/cuda/repos/ubuntu1804/x86_64/ /"
Ubuntu 20.04
sudo apt-key adv --fetch-keys https://developer.download.nvidia.com/compute/cuda/repos/ubuntu2004/x86_64/7fa2af80.pub
sudo add-apt-repository "deb https://developer.download.nvidia.com/compute/cuda/repos/ubuntu2004/x86_64/ /"
找到兼容的 CUDA 驱动程序版本。
以下脚本确定与我们刚刚安装的 NVIDIA 驱动程序兼容的最新 CUDA 驱动程序版本:
CUDA_DRIVER_VERSION=$(apt-cache madison cuda-drivers | awk '{print $3}' | sort -r | while read line; do
   if dpkg --compare-versions $(dpkg-query -f='${Version}\n' -W nvidia-driver-${NVIDIA_DRIVER_VERSION}) ge $line ; then
       echo "$line"
       break
   fi
done)
您可以通过运行
echo $CUDA_DRIVER_VERSION来检查 CUDA 驱动程序版本。输出是一个类似于455.32.00-1的版本字符串。使用上一步中识别的版本安装 CUDA 驱动程序。
sudo apt install cuda-drivers-${NVIDIA_DRIVER_VERSION}=${CUDA_DRIVER_VERSION} cuda-drivers=${CUDA_DRIVER_VERSION}可选:保留
dkms软件包。启用安全启动后,所有内核模块必须先签署然后才能加载。
dkms构建的内核模块不适用于虚拟机,因为在默认情况下它们没有正确签署。这是一个可选步骤,但它有助于防止您将来在无意中安装其他dkms软件包。如需保留
dkms软件包,请运行以下命令:sudo apt-get remove dkms && sudo apt-mark hold dkms安装 CUDA 工具包和运行时。
选择合适的 CUDA 版本。以下脚本确定与我们刚刚安装的 CUDA 驱动程序兼容的最新 CUDA 版本:
CUDA_VERSION=$(apt-cache showpkg cuda-drivers | grep -o 'cuda-runtime-[0-9][0-9]-[0-9],cuda-drivers [0-9\.]*' | while read line; do
   if dpkg --compare-versions ${CUDA_DRIVER_VERSION} ge $(echo $line | grep -Eo '[[:digit:]]+\.[[:digit:]]+') ; then
       echo $(echo $line | grep -Eo '[[:digit:]]+-[[:digit:]]')
       break
   fi
done)
您可以通过运行
echo $CUDA_VERSION来检查 CUDA 版本。输出是一个类似于11-1的版本字符串。安装 CUDA 软件包:
sudo apt install cuda-${CUDA_VERSION}验证 CUDA 安装:
sudo nvidia-smi
/usr/local/cuda/bin/nvcc --version
第一条命令输出 GPU 信息。第二条命令输出已安装的 CUDA 编译器版本。
验证 GPU 驱动程序的安装
驱动程序安装步骤完成后,请验证该驱动程序是否已正确安装和初始化。
连接到 Linux 实例,然后使用 nvidia-smi 命令验证该驱动程序是否正常运行。
sudo nvidia-smi
输出内容类似如下:
Mon Oct 11 12:51:37 2021
+-----------------------------------------------------------------------------+
| NVIDIA-SMI 470.57.02    Driver Version: 470.57.02    CUDA Version: 11.4     |
|-------------------------------+----------------------+----------------------+
| GPU  Name        Persistence-M| Bus-Id        Disp.A | Volatile Uncorr. ECC |
| Fan  Temp  Perf  Pwr:Usage/Cap|         Memory-Usage | GPU-Util  Compute M. |
|                               |                      |               MIG M. |
|===============================+======================+======================|
|   0  NVIDIA A100-SXM...  Off  | 00000000:00:04.0 Off |                    0 |
| N/A   41C    P0    50W / 400W |      0MiB / 40536MiB |      0%      Default |
|                               |                      |             Disabled |
+-------------------------------+----------------------+----------------------+

+-----------------------------------------------------------------------------+
| Processes:                                                                  |
|  GPU   GI   CI        PID   Type   Process name                  GPU Memory |
|        ID   ID                                                   Usage      |
|=============================================================================|
|  No running processes found                                                 |
+-----------------------------------------------------------------------------+
如果此命令失败,请查看以下内容:
检查该虚拟机是否挂接了任何 GPU。
使用以下命令检查是否有任何 NVIDIA PCI 设备:
sudo lspci | grep -i "nvidia"。检查驱动程序内核版本和虚拟机内核版本是否相同。
- 如需检查虚拟机内核版本,请运行
uname -r。 - 如需检查驱动程序内核版本,请运行
sudo apt-cache show linux-modules-nvidia-NVIDIA_DRIVER_VERSION-gcp。
如果版本不匹配,请重新启动虚拟机到新的内核版本。
- 如需检查虚拟机内核版本,请运行
注意:如果您使用自动安装脚本,则还可以使用 python3 install_gpu_driver.py verify 命令自动编译并运行使用 CUDA 框架的示例脚本。
文档信息
- 本文作者:Kiah Zhao
- 本文链接:/2022/10/23/install_cuda_ubuntu/
- 版权声明:自由转载-非商用-非衍生-保持署名(创意共享3.0许可证)
